
.jpg)
Send Custom Notifications Using Flow
In this blog we will learn about a common requirement in Service Cloud Implementation In Salesforce that is we need to send a custom notifications via salesforce notifications to the case owner that there is a new email on your case.
What are the benefits?
- Reduced Dependency on the email. Which means if you want to track any new email you can just go to the notification icon and check it. Let's face it we don't want to be spammed with 100's of email in our inbox.
- You don't need to switch between apps. We don't want to waste our time in switching to Gmail/yahoo and then to salesforce again. That's a task by itself.
- If you are using salesforce mobile app then we can send it like push notifications also.
Now, Let's learn how we can send custom notifications and use all of the above benefits. But, before that let's learn how we can create a custom notification.
Step 1 : For creating custom notification go to :
Setup > Notification Builder > Custom Notifications > New
In that it will ask you Custom Notification name, Api and supported channels.
Have a Look :

Now let's Create our flow to send notification.
Step 2 : Create a Record Trigger Flow because we want this to run everytime a record to a case is created.
For Object we will write "Email Message".
For Trigger a flow when we will choose "a record is created".
For entry conditions we will add Incoming equals to True.
Why Incoming equals to True is because we just want this to run when we receive an email.
Email message object is used for storing incoming and outgoing both the emails.
Step 3 : For creating action for sending notification we need some values which are :
- Custom Notification Type ID
- Notification Body
- Notification Title
- Recipients ID
Let's get Custom Notification Type ID.
Step 4 : Take a Get Record Element to get the Custom Notification Type ID. In Object we will write "Custom Notification Type" and in condition we will add "developername" equals to "Api Name of Our Custom Notification" in our case that is "Case_Notification".
Here is the Get Record Element :

Step 2 : For Recipients ID we will first take a collection variable and name it "Emailids".
Have a Look :

After that we will take Action Element and assign email to this Emailids variable.
Have a Look :

For Emailids we will set $Record(Email Message) > Case ID > Owner ID.
Step 4 : Take Action Element and on left side select "Notification". After that for Action Option Select "Send Custom Notifications".
Now, Let's fill the values.
For Custom Notification Type ID we will add "Get_Custom_Record_Id.Id". Check Step 4.
For Notification Body We will add a formula variable same as shown below :
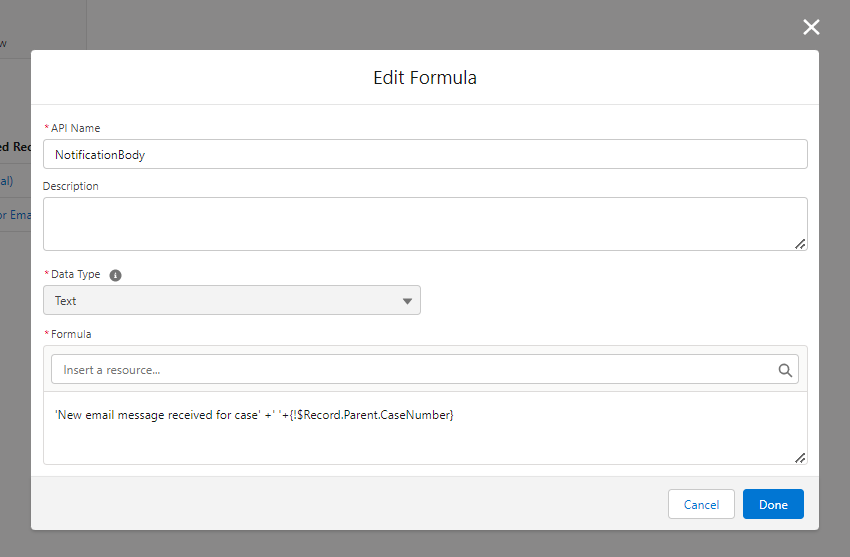
Here we have added 'New email message received for case' +' '+{!$Record.Parent.CaseNumber}
{!$Record.Parent.CaseNumber} this will show the case number for which the email is received.
For Notification Title I have added the same formula as body.
For Recipients Id I have added EmailIds variable which we have created earlier.
For Target Id we will add $Record.Id.
Have a Look :

That's it our flow is done.
Here is how the flow will look :

To checkout the video tutorial, Please go to this link :

If you have any question please leave a comment below.
If you would like to add something to this post please leave a comment below.
Share this blog with your friends if you find it helpful somehow !
Thanks
Let's learn and grow together.
Love and Peace! 🧡
.png)
.png)
.png)


.png)

.png)
.jpg)
.jpg)

.jpg&description=EP-20 | SEND CUSTOM NOTIFICATION USING FLOW | LIGHTNING FLOW SERIES⚡️)
0 Comments