Deep Cloning Using Flow
In this blog you will learn how to deep clone records. Before understanding Deep Cloning Please go through the previous episode of cloning the records using flow. For that you can check out this video tutorial also.
Now, what is Deep Cloning?
So if you want to clone one of multiple Accounts that will be call Cloning but what if you want to clone an Account as well as their Related Contacts. Here comes Deep Cloning.
Deep Cloning means cloning a record as well as it's related lists.
In this example we are going to learn that.
Brace Yourself! Because this is going to be an important example.
Use Case : Clone an Account with their Contacts. Add a clone button on account details page to clone.
Step 1 : Create a variable for getting the Account record id. For getting the record id create a variable with api name "recordId" and data type text.
Note : for getting the record id from detail page the variable api name should be "recordId".
Here it is :
Step 2 : Add a screen element to ask the user if they want to clone this account.
Have a look :
Step 3 : After that we will use Get Record Element to get the Account on the basis of the recordId which we have created in Step 1.
Here is the Get Record Element :
In this element we have given object name "Account" and in conditions section we have added where Id equals to "recordId".
After that we will have our Account in this Get Record Element.
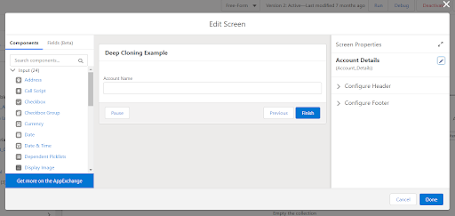
Step 4 : Now we want what Account name user want to save in the Account.
For that let's take a Screen Element and in that we will ask the user Account Name.
Have a look :
Step 5 : Now we will create a new variable for storing the accountid which we are going to create which is the clone account.
Here is the variable. For variable Api Name we will add "VarAccountId" and for Datatype we will add "Text".
Step 6 : Take Create Record Element to create the clone account.
In this for object we will add "Account" and for Fields we will choose "Use separate resources and literal values".
For setting field values in Name we will add Account_Name which is our TextBox from step 4. For Phone we will add Account Phone field from our Get Records Element.
Below that we will tick the checkbox "Manually Assign Variables" because we want to save this account id so that we can relate the Contacts to this Account.
In Variable we have added our VarAccountId Variable which we have created in step 5.
This is how our flow looks till now :
We have reached half way. Now we need to clone the contacts and related the contacts to this account.
Step 7 : Take a Get Record Element to get all the Contacts related to the Account. We will take all the contacts and in condition we will add AccountId equals to "recordId" which we have created in step 1.
Have a look :
Step 8 : Now we will loop through the contacts and clone those contacts but as you all know we should not use DML Operations inside loop. So, for that we will first take two variables and save contacts in that.
Why two Variables?
So, One will be a single record variable and another one with be collection of variable.
Let me show you how we are going to use that.
Here is the first variable.
We will name the first variable "varNewContact". Data type will be "record" and Object will be "contact".
Have a look :
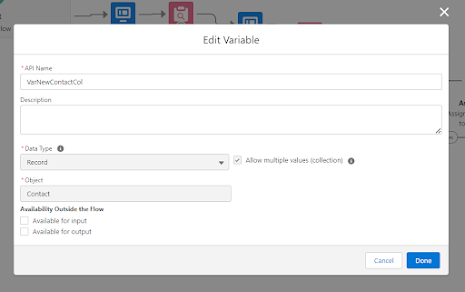
For the second variable we will name it "varnewcontactcol". Data type will be "record" and Object will be "contact". Now what is the difference?
For this we will tick the Allow Multiple Values checkbox. So that it will save multiple records in it.
Have a look :
Now, we will take a look element and we will loop through the contacts. While doing this after every item we will save the contact to varNewContact and then we will add varNewContact to VarNewContactCol.
Why?
Because when loop will go to the second item varNewContact's first value will be replaced with second. So, before loop goes to second item we will save the first one in our collection variable.
Step 9 : Take Loop Element and Loop through Contacts.
Here is the Loop Element :
In this for Collection Variable we will add our get record element name which we created in Step 7.
Step 10 : Take an Assignment Element and after every item in loop Add the loop value to VarNewContact by Assigning It.
Have a look :
Here you can see we are assigning VarAccountId to Account Id. Loop's first name to First Name and Loop's Last Name to Last Name.
After that we will take another assignment element and add VarNewContact to VarNewContactCol Variable.
Step 11 : Take a Create Record Element after Loop's Last Item so that we can create all the contacts together.
In this for how many records we have selected multiple because there could be multiple contacts, For Record Collection we have add our collection variable "VarNewContactCol" in which we have all our contacts.
And That's It.
Now this is a good practice to empty the collection variable so this step is just that.
Step 12 : Empty the VarNewContactCol collection variable.
Here we haven taken a simple variable named "Empty" and then with the help of assignment element I have assign Empty to VarNewContactCon. With that we have emptied varNewContactCol.
Step 13 : Show a success screen to user.
This is how your flow should look at the end of all the steps.
Well done you are a champion!
For video tutorial and detailed explanation checkout this link :

.jpg)


.png)
.png)
.png)
.png)
.png)
.png)
.png)


0 Comments